Official Luthiers Forum!
http://www-.luthiersforum.com/forum/

A Quick Inlay Sequence
http://www-.luthiersforum.com/forum/viewtopic.php?f=10102&t=5624
Page 1 of 2

Author:  Kevin Gallagher [ Mon Mar 13, 2006 7:12 pm ]
Post subject: 

   I just inlaid a Rose and Stem into a fingerboard that will end up on a Ryan Cathedral being built for a player who owns a pair Omega guitars that he'd purchased from me.

   It is an inlay that has landed in several guitars over the years including my very first acoustic guitar build. It is in the fingerboard of an MJ that Steve Wiggins used to record all of the acoustic tracks for Big Tent Revival's recordings and still uses as his main guitar to this day. It also was inlaid into a guitar for the partner of Herb Chapman in Chapman's Music in Paducah, KY. Herb is father to Steven Curtis Chapman and is a very close friend of mine. His partner, Keith Rose had a dozen roses inlaid in his commissioned guitar, all of which were variations on this design connected by a vine of thorny stems and lots of green Abalone leaf clusters. His inlay ran all the way up the fingerboard anthrough the nut into the headstock.

   Here's a quick photo sequence of me executing this most recent Rose inlay.


   This may be of some interest to those who may have been considering breaking into the craft or art of inlay to adorn their guitars as they build them.

   I teach a three day class specifically on inlay techniques, tools and methods a few times a year and they're always fun. Those classes are usually attended by people who have taken my one week building class and have begun to build on their own.

Thanks and regards,
Kevin Gallagher/Omega GuitarsKevin Gallagher38790.7027662037

Author:  Rod True [ Mon Mar 13, 2006 8:14 pm ]
Post subject: 

That is just beautiful Kevin. Is this for the orphanage guitar?

So, after you get it all inlayed, how do you cut the slots? dental bur?

Author:  A Peebels [ Mon Mar 13, 2006 10:00 pm ]
Post subject: 

Absolutely incredible.

Al

Author:  hoosierukes [ Mon Mar 13, 2006 10:15 pm ]
Post subject: 

Wow!

When, where and how much for the class?

Author:  John Kinnaird [ Mon Mar 13, 2006 10:55 pm ]
Post subject: 

Beautiful Rose Kevin! Very helpful pics as well.   Do you glue down the pieces to the fingerboard before you scribe the outline around them? If you do glue them down, how do you get them up?
Where do you get stuff like that special blend engraving filler? Does that box read William Laskin on the top, and is that Grit?

John

Author:  Serge Poirier [ Mon Mar 13, 2006 11:19 pm ]
Post subject: 

If you ever come to Canada, i'll be the most listening and watching student of your class! Great workmanship, i was too scared to try this on my first but confident i'll try on my second!

Thanks for sharing this great tutorial!

Serge

Author:  Bobc [ Mon Mar 13, 2006 11:32 pm ]
Post subject: 

[QUOTE=John Kinnaird] Beautiful Rose Kevin! Very helpful pics as well.   Do you glue down the pieces to the fingerboard before you scribe the outline around them? If you do glue them down, how do you get them up?
Where do you get stuff like that special blend engraving filler? Does that box read William Laskin on the top, and is that Grit?

John[/QUOTE]
Same questions I have.

Author:  Bruce Dickey [ Tue Mar 14, 2006 12:40 am ]
Post subject: 

Very nice Kevin. That Ryan will have a pretty Gallagher Rose. Thanks for sharing. I'm archiving this page for future reference. You are welcome to have a class in Arkansas at my place, no charge. You can have my son's room, he's getting married!

Author:  Mark Tripp [ Tue Mar 14, 2006 12:50 am ]
Post subject: 

Beautiful Kevin!

I'm printing this out as a reference!

-Mark

Author:  Serge Poirier [ Tue Mar 14, 2006 12:53 am ]
Post subject: 

Same here!

Author:  Kevin Gallagher [ Tue Mar 14, 2006 1:20 am ]
Post subject: 

    The engraving filler is from Grit Laskin...or was. He was offering it back in the early 90s and he gave me a box at the ASIA Symposium when it was held here at Lafayette College in Easton, PA...1992?...93?. I later bought a dozen boxes to have on hand...not knowing how long one would last.

    Well, I have only opened two of the boxes and I have done alot of inlays since getting them. There's one at either end of my shop on a shelf and neither shows signs of running out yet(I've only used a single stick in each box).I gave a couple away to friends who took my class, but have held onto the rest since I heard that it isn't available anymore.

   I'll have to check with Grit to see if he is selling it now. it's a very densely pigmented crayonlike stick that is metal based from what I understand. You just smear it into your engraving and then scrub off the excess to reveal the intended engraving lines. Under finish or unfinished, it stays put and doesn't rub out under playing. If an inlay shows signs of having the engraving wear off due to play contact, it's not a big task to recut the engraving lines and fill them.

   Simple, clean and easy enough for a guy like me to love it.

Thanks,
Kevin Gallagher/Omega Guitars


Author:  Brock Poling [ Tue Mar 14, 2006 1:32 am ]
Post subject: 


StewMac is selling it.

Laskin Inlay Filler

Author:  hoosierukes [ Tue Mar 14, 2006 1:32 am ]
Post subject: 

Stewart McDonald carries it.

Laskin's Engraving Filler

Author:  hoosierukes [ Tue Mar 14, 2006 1:33 am ]
Post subject: 

Kevin-

When and where are your classes?

Author:  Anthony Z [ Tue Mar 14, 2006 1:36 am ]
Post subject: 

Kevin, nice work!

StewMac now sells the Laskin filler: Item# 4406 Laskin's Engraving Filler

I gather from your photo that you CA all the pieces up on wax paper overlayed on the drawing? Then tack glue the inlay composition to the fretboard for scribing?

Was the Rose glued up with CA, dyed epoxy or was it filled with ebony dust?Anthony Z38790.4016666667

Author:  Colby Horton [ Tue Mar 14, 2006 1:41 am ]
Post subject: 

Awesome work!!!

Thanks for posting.

Author:  Evan Gluck [ Tue Mar 14, 2006 1:42 am ]
Post subject: 

Wow beautiful, I have inlaid the same rose on a guitar I have. I put it in the pickguard, although I threw a womans face on the top. I think it is on my website somewhere. It is amazing we chose the same rose I think.
Great work Kevin.
Evan

Author:  Don Williams [ Tue Mar 14, 2006 2:07 am ]
Post subject: 

That's beyond my feeble skills. I can handle all the technical stuff just fine, it's the artistic stuff where my abilities lack. That's really beautiful. nice to see more of that kind of stuff.
At least I'm really good at dots...


Author:  Dave Rector [ Tue Mar 14, 2006 2:17 am ]
Post subject: 

I have the same problem as Don. The artistic stuff is just beyond my reach. Great pictorial Kevin, thanks!

Author:  John How [ Tue Mar 14, 2006 2:41 am ]
Post subject: 

That is great stuff Kevin but no matter how you slice it that wouldn't be a quick inlay sequence for me. I'd still be fumbling with the design and I'd be calling an inlay guy for a quote by now.

Author:  Anthony Z [ Tue Mar 14, 2006 2:45 am ]
Post subject: 

John, inlay isn't all that tough -- most important thing is to start with a really good clean drawing. (But hey -- wasn't it you who dropped out of Amy Hopkins inlay class at ASIA last summer )

Author:  John How [ Tue Mar 14, 2006 3:26 am ]
Post subject: 

I dropped out years ago

Author:  Kevin Gallagher [ Tue Mar 14, 2006 6:05 am ]
Post subject: 

AnthonyZ,
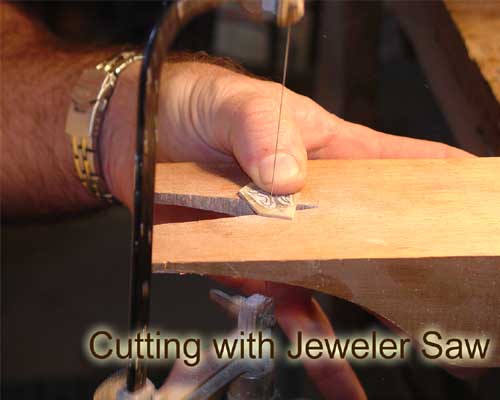
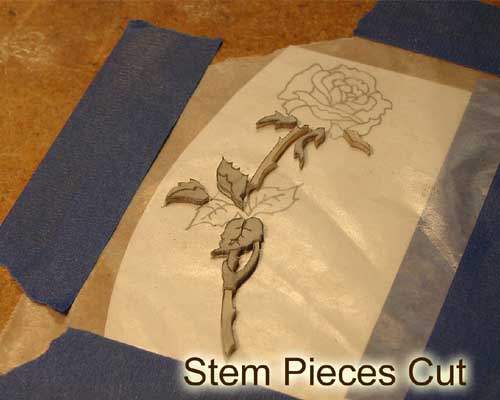
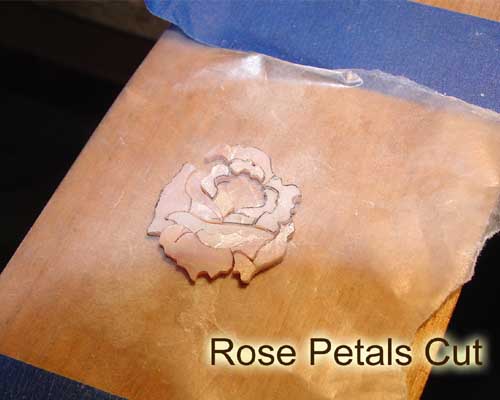
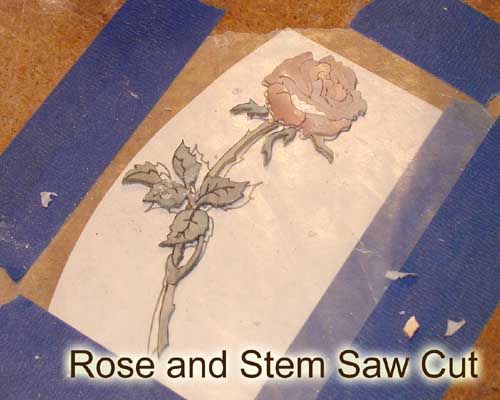
   Yes, I usually lay all of the pieces over the drawing that is taped down under wax paper to keep track of what I still need to cut. When all are cut, I dress whatever needs to be touched with jeweler's files and fit them together. Then I CA glue them together on the wax paper being careful to keep the glue light to avoid running between pieces and additional cleanup before tracing it onto the surface it will be laid into.

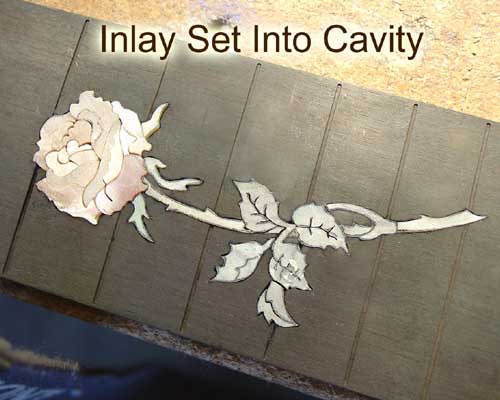
   I glue the entire assembled inlay onto the fingerboard using Duco cement and allow it to dry for a few hours. After cutting the tracing around it, I use a small spatula to coax it off of the board again. If it comes aprt, it's usually only a part or two that work loose so it's easy enough to get together again.

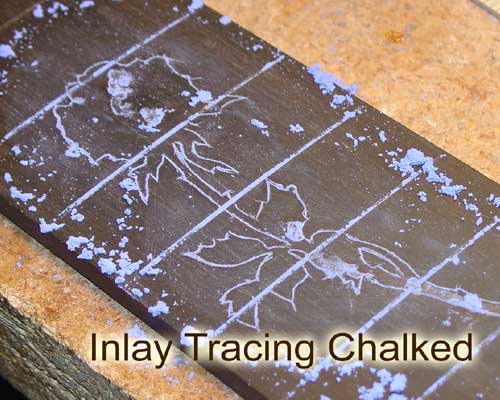
I never use a scribe to trace the piece onto the surface, but always use an Xacto knife with a fresh blade to cut a line around the item being inlaid. The scribe will press the line into the surface by mashing the material down or can scrape a very small goove into the surface by dragging material out. The Xacto knife actually cuts the line into the surface very cleanly and during the rout of the cavity, provides for a clean line to chip to and an even cleaner shearing action for the downcut edges.

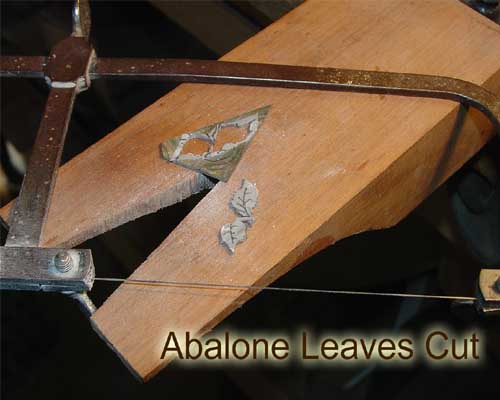
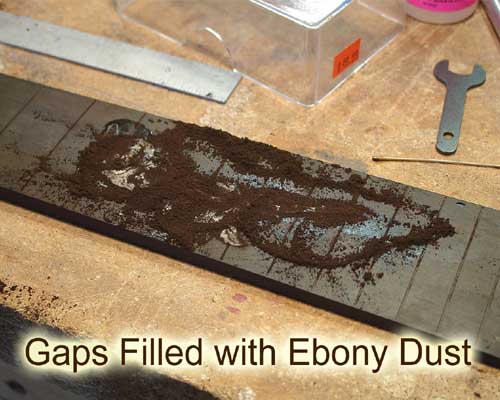
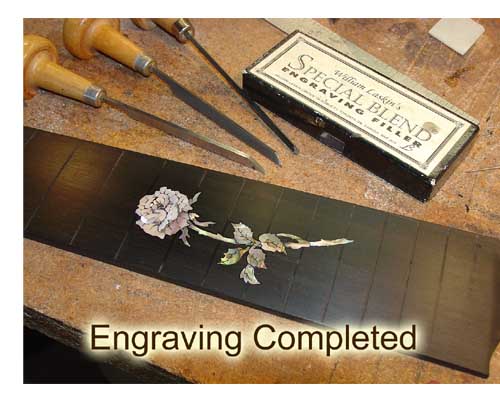
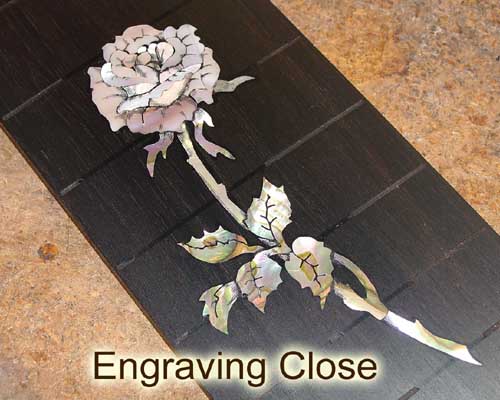
   I always fill gaps withvery fine ebony dust and then drip in thin viscosity CA glue. Once the surface is covered, I usually sprinkle more dust on top of the wet glue allowing the glue to wick it into the low surface areas.


Evan,
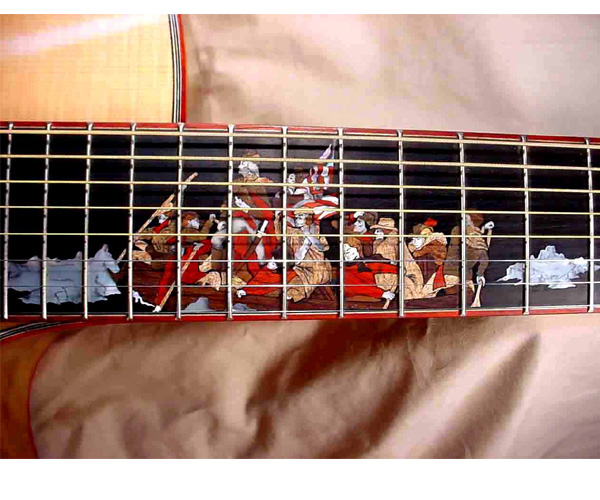
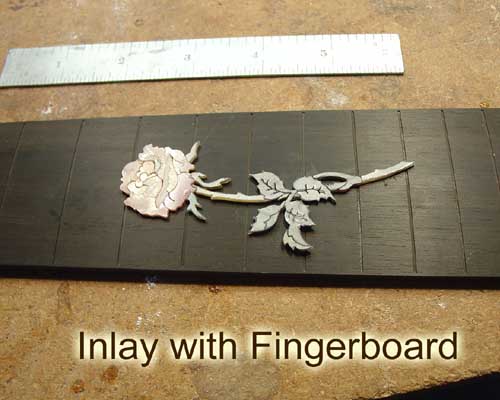
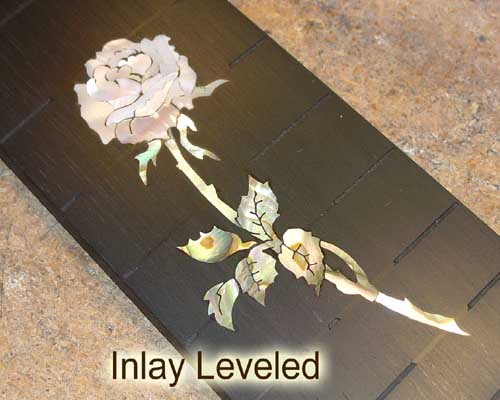
   I actually drew that rose from somewhere back in 1991 when I was planning my resignation from Martin to form Omega Guitars and venture into a full time acoustic building effort that has been going well ever since. Couldn't tell you where I first saw it, but I really like it as a solo inlay in either fingerboard or headstock.


hoosierukes,
   I always hold my classes her in my shop in the Pocono Mountains of northeast PA. I'm only just over an hour from either New York or Philadelphia and am only 35 minutes from Allentown,PA.

   The classes run for three days and we are pretty flexible with the hours each day. I use to try to stick to a regimen of 8AM to 4PM each day, but if you've ever hung around a luthier in his own shop....well, you know how time flies by...and we'd end up rolling in at 8PM or later on at least one of the days. I just schedule the three days and plan o getting started here in my shop by 9AM and we just go from there.

   Cost of the class is $650.00 and the price includes the class, a jeweler saw, a set of jeweler files, an ounce of Mother Of Pearl, an ounce of Green Abalone and an ounce of Gold Mother Of Pearl and two fingerboards to inlay in during the class. Also included is Material to make a support deck for sawing which we do on the opening morning in order to create a deck that is comfortable for each student. Some like a very narrow deck with several dfferent approach areas an a slot or two for close support and others like a larger landing with a single opening to swing the shell around on. I don't use a blower of any kind ,but prefer to clear the dust as I work with a breath here and there. A small blower made from a light duty aquarium filter pump can be provided at a minimal extra fee if desired. We usually biuld a support for the air line directly into the deck if a student wants to use the blower to provide continuous clearance of the dust on the pieces being cut. With the provision of the deck material, a C clamp is provided to hold it to the bench or table.

   I always encourage students for the classes to gather artwork and drawings that they'd like to attempt to interpret into shell and inlay and bring them along. We scan, size and duplicate them here for use during the three days.

I have a class with five students from Japan going on in May, but will likely schedule another in June or July. They're fun short classes and fly by before you know it, but three days is plenty to get a good idea of the inlay process and proper saw technique. With what each person walks away with, they are eqipped and prepared to go righ at it when they get home.


Thanks and regards,
Kevin Gallagher/Omega GuitarsKevin Gallagher38790.589375

Author:  Michael Dale Payne [ Tue Mar 14, 2006 6:27 am ]
Post subject: 

very nice designed rose.

If I were to critique anything it would be the channeling job. There are some rather large gaps. These are easy to hide in ebony, but get much tougher to hide in rosewood and any other wood. I agree with Kevin get away from the scribe and use an Exacto knife. I also glue up the inlay after fine fitting with jeweler files then glue the inlay down with Duco and trace with the Exacto knife.

Good tight channeling is essential to inlaying on lighter woods and a cut edge makes it easer to keep to the shape. When I am channeling for binding or purfling I like a heavy tool, but when channeling for fine detailed inlay I prefer my foredoom because it is light and easy to control. I take great pains to rout the outer perimeter very carefully to the pattern and not past it anywhere. It is a painstaking procedure but make all the difference.

Author:  Kevin Gallagher [ Tue Mar 14, 2006 3:25 pm ]
Post subject: 

Michael,

   I'll look forward to seeing some of your inlay projects displayed through images here in the future.

   Here's another small inlay I did a few years ago. It was inspired by Emanuel Leutze's "Washington's Crossing"
painting.


Thanks for looking again,
Kevin Gallagher/Omega GuitarsKevin Gallagher38790.9798726852

Page 1 of 2 All times are UTC - 5 hours
Powered by phpBB® Forum Software © phpBB Group
http://www.phpbb.com/